Showing posts with label projects. Show all posts

12.11.2013

HOLIDAY | gift wrapping II

Feeling inspired by the gift wrapping themes shown in my previous post, I headed out to Paper Source and Michaels to pick up the materials I needed.  I wanted to combine the black, gold, and natural elements, similar to pepermint, but also incorporate the chalkboard look from the Nashville Wraps tutorial.


Paper Source: matte black wrapping paper | jute rope | chalkboard tags | chalk ink marker
Michaels: gold wrapping paper | garland


12.03.2013

HOLIDAY | gift wrapping I


One of the activities I most look forward to during the holidays is wrapping presents!  Actually, it might be my favorite part of gifting all year round.  For the past few years I've selected a theme, this year I'm really leaning towards a black and neutral palette with metallic accents or maybe chalkboard style.

Here are some images I've been looking to for inspiration this year.


images
1) brunch at saks, 2) style me pretty, 3-4) pepermint, 5) Poppytalk, 6) papermash, 7) Nashville Wraps, 8) chicfluff

12.10.2012

SEWING - masculine apron

Although I do quite a bit of the cooking, Chris also cooks often and makes excellent dishes. He does this not because he loves to cook, but because he loves to eat. :) With an interest in bread baking, last Christmas I gave him The Bread Baker's Apprentice: Mastering the Art of Extraordinary Bread, by Peter Reinhart, along with some helpful tools to get him started; a digital scale, dough scraper, and bread pan.

We've enjoyed wonderfully fluffy challah, deliciously seasoned focaccia, and have become devoted to our home-made pizza doughs. Something I didn't think to get him however, was a baker's apron. The process of baking bread is extraordinarily messy (at least in our kitchen), flour and small dollops of dough everywhere!

Therefore, this weekends project was to make him an apron, not just any apron, but a masculine apron he would actually wear. An apron which fit his cooking and baking philosophy. The "I'd Rather Be Eating" apron.


Although I have made a few aprons, and have several apron patterns, all of them are pretty girly. For a basic apron, I printed this Chef's Apron pattern from Martha Stewart's crafts online. This is a very simple pattern, a great beginnings sewing project, comprised of three sides which are sewn together. I also made basic ties rather than adjustable ones, and brought it to knee length.

After completing the sewing of the apron, I decided to use an iron-on transfer for the text. With Illustrator I arranged the text with a font and alignment he liked, and made it approximately 8" across.


Next, for the transfer paper, the text is changed to outlines and flipped. After that, its just print, trim, and transfer!


My luck with iron on transfers is very hit or miss. The text didn't completely transfer, but the somewhat distress looked turned out to be a nice effect!


Can't wait for his next creation!

4.18.2010

PROJECT - napkins

This weekend, inspired by David Lebovitz's article on French Napkins, I began two napkin projects.

The first, creating a prototype for numbered napkins to add to the InboundThread line.

The second, making napkins more available in our home. With scape fabric, I made several sets of napkins, placed them in a glass bowl, and designated current napkins in use with napkin rings.


We're basically using the same napkins till we feel they really need to be washed. I still have some nice napkins I will only take out for special occasions/guest.

3.10.2010

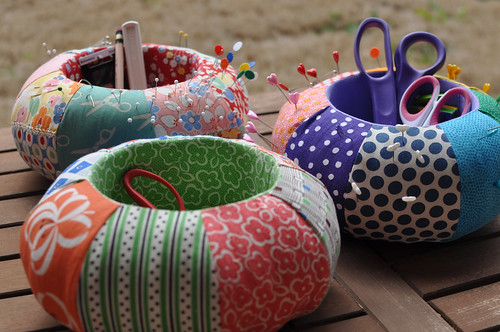
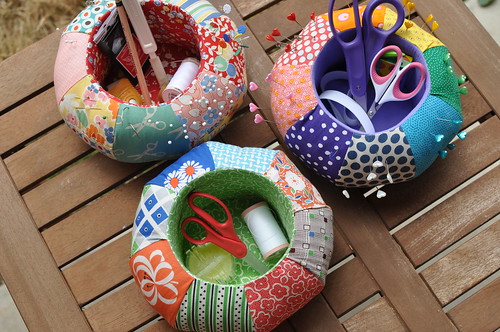
SEWING - pin cushion

Such a great pin cushion featured in, and designed by, Anna Maria Horner. Another reason I want her pattern book, Seams To Me.


More images of Pincushion Pattern from Texas Freckles, who went "Pincushion Crazy".


3.01.2010

PROJECT - merrimeko tapestry

Around my birthday I posted a WISH LIST of wall decor items, one being this Merrimeko tapestry, TULIP. Although it would pop more against a darker wall, I am very happy with it above the fireplace.

Images below show how to use canvas stretchers for fabric wall hangings.

Tools: canvas stretchers, staple gun, wire and wire cutters.


1.24.2010

PROJECT - rast chest

We were inspired by all these projects involving the IKEA RAST chest of drawers.

Georganne's Bedroom via Design*Sponge
Weekend Project: 2 Days, 2 Nightstands from Insight Blog
Side Table Project from Aubrey + Lindsay

As I already had the primer, paint, and stain for this project, and each chest was only $39.99, it seemed like a pretty good deal! So onto the bandwagon we jumped!

1.15.2010

PROJECT - travel guide cover

Planning a trip to Peru with the help of The Rough Guide Peru. If in need of my guide while on our trip, I created this quick and simple book cover, as not to scream "I'm confused/lost/ridiculous".


Getting very excited for our trip!

12.09.2009

PROJECT - secretary desk

For about a year, I have been eying the white finished Graham Desk from Pottery barn. It has great storage for both office and craft supplies, and the size and color would be a good fit for our work space.

Luckily, I recently inherited this old pull out secretary desk.


It had some serious scratches and deep dents that couldn't be sanded out, which made it the perfect project for my desk space.


After some light sanding, wood putty for the dents and scratches, and some coats of primer and paint, this old desk has made me very happy.


10.24.2009

THROW PILLLOWS - tutorial

These throw pillows were made as a gift for my friend Andrew. Looking through scrapbooks, I was inspired by the look of linen, burlap, and hemp mixed with simple red stitching and dyes. After some experimental decorative stitching, I was ready to create Andrew's throw pillows.


supplies:

- fabric (I used osnaburg)
- decorative thread (red)
- fabric matching thread
- fiber fill

1. Measure and cut 2 panels (front and back) of fabric about 1/2" larger than you're desired pillow size. Here I cut 4 panels for 2 pillows, each 16.5 x 12.5 in.


2. Create a guide for decorative stitching. I used masking tape, however there are many ways to do this. Place guide about a 1/4" from the location of your desired stitch.


3. Align your guide to the outside edge of your sewing machine's pressure foot, and follow as you sew your decorative stitch. To create thicker and thinner variations of decorative stitching, set your machine's zigzag stitch on a short length and a wide width such at .5 to 5. Continue stitching on all panels, moving the masking tape as needed to create guides for additional lines. Here, I stitched two panels with horizontal lines and two with vertical lines.


4. Pin right sides of 2 panels and sew together, leaving about a 2" open at the bottom. Trim edges to reduce bulk.


5. Turn inside out, iron edges and 2" gap.


6. Stuff opening with poly-fill and pin closed.


7. Either hand stitch the opening closed, or sewed along all edges to create an elevated seam (as shown).


Finished pillows!